Friday, August 12, 2011

Itallian biscotti

 I was  against  buying this product  from costco.. ITALIAN BISCOTTI..  it  was  not becoz i didnot  like  it its  bcoz  it costed  much ... hhahah   me and  my  mind  then  i  got  it bcoz  Rhea  wanted  it . The  moment i tasted  it  i  knew  i am  gonna bake this . i did not search  for the  recipes  immediately , but  first  thing i  did  was  i  finished  the  box and then when i was  out  of  it i  searched  for the  recipes . Last  15 days i was  down  with  severe  back  pain  so  was not allowed  into the  kitchen .So the  delay...
 Its  very  delicious  and  believe  me   you will  like  it for  sure . Here  is the  step wise recipe  ...

Ingredients :

  •  1 cup of almonds 
  • 2/3 cup of Sugar 
  • 2 large  eggs 
  • 1tsp of  baking powder
  • pinch of  salt 
  • Vanilla  extract 
  • almond  extract
  • 1 3/4 cup of  All purpose flour 
How  i did it :

Step 1 : Toasting  almonds
  •  Line the baking  tray  with the parchment  paper or  foil , Put ur  almond   in the   tray  either blanched or  with the skin . keep it in the  oven at  350 degree F  for  10 mins  or  till is  slightly  brown 
Step  2 : Biscotti 
  • In a  big  bowl  take the all purpose flour, salt and the  baking  powder mix well and  keep it aside ,
  • In another  bowl  break in  your  eggs  and  add the  sugar , and  beat  it  till it gets blended and  becomes  fluffy. Add in  your  vanilla and  almond  extract

  •  Now add in the the flour and  baking  powder and  mix  in well. add your almonds from the step 1.
  • Use hand  to mix  it  its   quite  sticky  but  if u cant  manage  it  add some  dry all purpose flour.
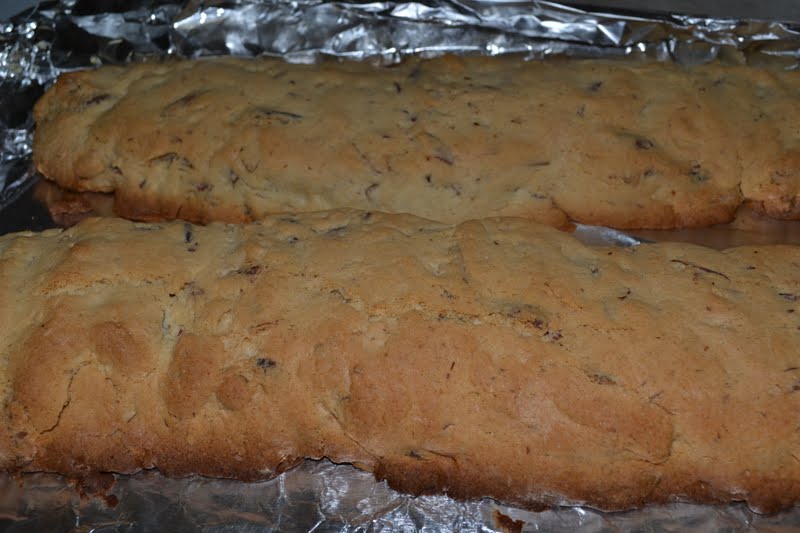
  • Line  the  baking  tray  with a  parchment paper  or  foil, spread the wet  mix in form a  long bread or  log 


  • Bake it  a preheated  oven  for 25 mins  at 350 degree F
  •  Take  it  out  cool  for  10 mins  and  with  the  knife  cut  ito 1/2 inch pieces 


  •  Places  these  cut  biscotti  on the  baking  tray  and   bake  it for the  second  time  at  300 degree  for  15 mins ,  nce  done   col them  off on cooling  rack .


Wednesday, August 3, 2011

Soya beans (Meal maker) gravy

This  one is  a protein rich  food  and is  very  delicious  if u  love the  taste of the meal maker , i have  been using   soya chunks  for  quite  some  time in my kitchen knwing all the nutrius  value its  had   got , though me  and  my  family were not a great fan of  it intially now we  have  started  liking  it, specially  my daughter  who  thinks  its chicken. She is  happy with it and so am  I.
This   one is  a  avery simple  recipe   which  is  easy    to make and  no prior preperations are required.


Soya Chunks Gravy.

  •  1 1/2  cup of  soya  chunks
  • 1 Onion 
  • 1  tomato
  • 3-4 Green chillies
  • 1 big  table  spoon  ginger  garlic  paste
  • 1 spoon  chilli powder
  • 1 small spoon turmeric 
  • springs  of  curry  leaves
  • springs  of  cilantro/kotmir
  • Pinch of  garam masala powder 
  • Salt  to  taste 
  • Oil 
 Step 1:  soak the  soya  chunks  in water   and  microwave it  for  couple of  minutes , cool it  squeeze  it   and keep the  chunks  dry.

 Step 2 :
In a   kadai   take  oil   and  once  heated  add  diced onions  and  slit  green chillies and  curry leaves , fry them till they are lightly brown in colour . Add in  ginger garlic  paste  fry till the  raw smell is  gone , add  diced tomatoes  and the squeezed out  soya  chunks  from step 1 and  a little  water , Add in  all  your spices,  cook   in  low  flame  till  the raw smell of  the  spices  is  gone and  the  tomatoes  is   completely  cooked .   Garnish  it  with  fresh cilantro and is  ready to serve .


Saturday, July 16, 2011

chocolate walnut brownies

 hey  these are  my  favorite.. i love  brownie and  specially  with  vanilla  ice cream. They are  so  nice   crunchy yet soft  and  walnut  adds more  yummmmmmmmm to it. i love the  crunchy crust and the chewy center with lots  of nuts which  makes  it  more delicious. i  have  been a great  fan   of  brownies   but  never tried  them at  home  and  so this   was  my  virgin trial  and  this  was  for yamini  who  had  this brownie craving in her 7th month of  pregnancy. The  sad  part  of the  this  was  i  was baking  it  for her farewell party. 
This recipe  is  from the  the  website  joy of  baking.


Ingredients:

  • 1/4 cup of unsweetened cocoa powder
  • 1/2 teaspoon ground cinnamon 
  • 1/4 teaspoon salt
  • 1/2 cup (8 tablespoons) unsalted butter (2 sticks)
  • 1/2 cup unsweetened cocoa powder
  • 2 teaspoons finely ground instant coffee
  • 2 large eggs, preferably at room temperature
  • 1 cup sugar
  • 1 teaspoon pure vanilla extract
  • 1 cup broken or chopped walnuts or pecans

How  i made it 

  •  In a  double  boiler   melt the butter  and   to it add the  cocoa powder and  coffee powder. Mix well. let  it cool down.
  • Now beat the  eggs   into it and   now  add  sugar  and vanilla  essence  mix well.
  • Whisk in the  cinnamon and  salt  and  flour together.
  • Add the flour  and  mix well till its  incorporated .
  • Add in ur  walnuts   pour it  in a greased bake pan and  is  ready  to bake 
Prehaet the  oven  at  350 degree F  and  bake it  350 degree F for  30 mins.


Mango Ice - Cream

 Mango Ice  cream


Ingredients that we need

  • 500ml of milk
  • Fresh Mango
  • 2-3 spoon full of corn starch
  • 500gms of sugar
  • Half tin( 150 ml ) of condensed milk
  •  250 ml of heavy whipping cream 
How i did  it

  • Boil the milk in a heavy bottomed vessel , Add about 400 gms of sugar to it, keeps stirring and reduce the flame. Once the sugar dissolves , remove the milk from the flame.
  • Mix  the cornflour  in  litttle cold milk , and stir  the mixture into the boiled milk, keep the  milk  back on low flame , till it thickens.(u will know when you see it) Switch off the  flame and cool the mixture.
  • Take Mango( the amount depends on  your taste buds. i used about 3-4 ripe) in the mixer add to it about  50 gms of sugar and  blend it  into a smooth pulp. u can add some milk  to it  to make it  more soft . Add this mango pulp to the boiled and cooled milk.
  • Add the condensed milk  and freeze it in the freezer.
  • let the mixture get semi freezed , thaw it  blend the mixture using a blender or mixer,  u can  use had mixer too.
  • Add the whipped cream to the mixture, blend it again (i used the hand mixer), to it add small cut peices of  fresh Mango (i used around 3-4 of them) 
  • Freeze  it , your Mango ice-cream is ready.
Whipping cream.

Freeze the bowl and the whipper blades  before starting the whipping process, it should be very cold.
 take the whipping  cream in  a cold  bowl (I used the store bought heavy whipping cream)

 and  whip it  using a  hand blender till soft peak are formed , donot over do it as it  will convert to butter. once the soft peaks are formed add 2-3 table spoons of sugar . Now its ready to use.


Ras Malai

This  one  is  consider as the  king of  milk sweet and  they  say  its  heavenly.I  have not tasted it as i  dont  like milk sweet , but  i  could not  keep  my   hands from trying  it  as its  my  mom favorite and  i wanted Rhea and  bass to  enjoy it as well. I made this  especially  for  my Mom. i am sure  she  would have  loved  it and appreciated my efforts.
Mom  this  is  for   u .


 Ingredients

 To  Make  Paneer
  •  1 1/2 lts of milk (use any  milk  u  like   i  used the  whole  milk)
  • 2-4 tsp of  vinegar  or  lemon juice 
  • nice chesse cloth (  i used  white  thin cotton dupatta)  
  • ice  cubes
 How  I made it .

 In a  nice  big  vessel take  in your milk , keep on medium flame and  bring  it  to a  boil, once  it  comes to a rolling  boil , add  diluted  vinegar or  lemon juice  to it  and  keep  stirring , the  milk will start  curdling once u  see the  water seperating  add ice  cubes and  switch of the  flames . The  addition of ice  cube  is to  stop furthur curdling of the milk . Strain out all the water  and  take  the  cheese/ paneer in ur  chesse cloth, close  all the  four  ends of the  cloth, like   making a   knot, squeeze out all the   water ,   rinse  with fresh  water  to remove the  last traces of  vinegar, now  tie a  knot  hang it for  30 -40 mins so that all the water is drained.  Your paneer for Ras malai is  ready.

To  Make the Ras ( milk sause)

Ingredients

  • 1 lts Milk
  • sugar
  • Cardamom Powder
  • Nuts (pista and badam)
  • saffron strands.

In another  big vessel take  milk and  keep in a  low  flame , bring the  milk to boil , add strands of  saffron.You get a  nice  mild yellow  colour  and  keep stirring , its  its  reduced to half of the volume. Once the  volume is  reduced add sugar and  nuts. Keep it aside to cool.

To make the  paneer dumplings .

Take the  paneer that  was  made , and knead  it slightly  so that  it becomes  soft  and smooth , take a  small bit and  with the  help of   your palm  make a  small  dumpling and  the  press it  to  flatten it .  In  another  big  bowl  take  sugar and  water  in 1: 5  ratio, that  is  1 cup of  sugar and  5 cups  of  water.  Bring it  to a  rolling  boil once its  boiling add these  5-6 dumplings  to it , and  cover it . Boil the  dumplings for about 5-6 mins. you can see that the dumpling   have increased in  volume and  has become soft and  fluffy. Strain them and  add them to the  Ras /milk cream u  prepared in step 2 .Repeat the  same  process for all the  dumpling  made . Note that  the  sugar syrup dosent   get  thick.
Keep the  Rasmalai in the fridge and  serve it cold.


Monday, July 4, 2011

Dil pasand Bakery style

 The  word Dil Pasnad  directly  takes  me  back  to my  childhood , all of  which i grew  up eating Dil-pasand and honey cake  and  cream bun from Bangalore iyengars bakery. Yummmmmmmmm !!!!!!!!!!!!!  i still can  feel the  taste and   will never forget it. Every interval  at school , every special class and every outing was incomplete  without  it ,  Infact when i was pregnant , this  was  there in my  big  wish  list i had  of  food, Believe  me or not i  went to bakery  in my  ninth month  and  had this  without anybody  knowing,  as i was  on  strict no-sugar diet. i cannot  resist the  hard crisp coat  with  cruchy  coconut filling with lots  of  tutty- futty. I  relished it and  i did not want Rhea  to miss out on this  and  therefore  tried this .


 Ingredients:
  • 1 puff pastry sheet  (pepper ridge) Thawed at  room temperature.
  • 2 cup Shredded coconut( i used the  store bought ) Thawed  at  room  temperature 
  • 1 cup Tutty frutty 
  • 2 cups Sugar
  • 1tsp cardamom powder.
 How i made it.
Take a wide pan  add sugar to it add water just enough to dissolve the sugar, Keep  it on  medium flame , Allow it  come to a boil  now   add the shredded coconut , tutty  futty  and  the  cardamom powder. Mix  up all the  ingredients  in a  such  a  way that  they  get  blended . If  u feel that  the  mix  is  a  little  runny  then keep it up on flame till its dry .
 Mean while  get ur  pastry  sheet ready , Thaw  it in room  temperature and open it  up , cut   out a  big circle  from one  of the  sheets  and  another  circle  from another  sheet  but  a  little  smaller in size than the  first circle.
Now put  in the  coconut stuffing  on the  center of the  first  circle and  spread , cover  it  with the  second  puff pastry sheet. Seal the  edges  and is   ready to  bake ,  Bake  it  at 350 degree F, for  20-30 min or  till its golden brown  in colour.
With the  left  over  puff pastry  sheets   use your  own imagination and makes  diffent shapes and  sizes.
Enjoy the Di pasand  with ur  child hood  memory , iam sure  u will  love  and  crave  for  more .


Wednesday, June 29, 2011

Chicken Fry ( KFC style )

This is  one  of recipes i got  from my friend and neighbour   from chennai , But the  same  recipe  is also posted by vah chef. Its almost the same  with a little a difference  in the  first  step. But  both taste  great .Its  simple  to make but  people  who  hate il will stay  away from it  as it requires deep  frying.


Item : Chicken fry ( KFC Style)
Source:  My friend Sameera and  Vah chef

Ingredients:

To  marinate ;

  •   1 lb of  chicken  ( washed  cleaned and  if  pieces are big then  you have a  make  tiny slits  on them )
  •  1tsp Chilli powder
  •  1 tsp Ginger garlic  paste
  •  Lemon juice ( from one lemon  medium sized)
  •  Salt
 To Coat:

  • 1 egg
  • 1/2tsp of  Ginger garlic  paste 
  • salt 
  • 1/2 tsp of  chilli powder
  • Curry leaves
  • Cilantro/ coriander leaves
  • 1cup maida
  • 1/4 cup bread crumbs
  • food  colour 
  • Oil for  frying 
How  i did  it  :
  Take water and add ginger garlic paste, chilli powder, salt , and lemon juice  now add the chicken pieces to it. Should immerse completely,  the  water  level should  be above the  chicken pieces . Soak it for 4-5 hrs.  I prefer to leave it in the fridge overnight. If u are in a  a  hurry  u  can  do the whole process  using  warm  water and  leaving  it for  1  hr .
Drain  the  water and  take  the  pieces in a dry  plate . 
In  another  bowl  add 1 egg, add  chilli powder, salt ( add a  little  as u have added it  n marination too), ginger garlic paste  and  curry leaves and  cilantro. mix  well.
In another  plate  take  your  all purpose flour, mix  bread crumbs , add a  pinch  of  food  colour and  salt and chilli powder( adjust the  amount of  chilli powder  and  salt in all the three steps  so that  u  do  end  up adding more.)
Take the  chicken pieces  dip it in the  egg mix, roll  in to the  dry  flour  and  then  deep fry it in  oil  at  medium  flame .


Saturday, June 25, 2011

Molten chocolate lava cake

 Oh!!!  this  is  a very  yummy  cake  and  heaven for all  chocolate lovers. This  cake  has  a  runny chocolate inside  and  was  my all time  favorite. I used to  eat  a lot in  CCD (cafe coffee day) @ Bangalore. This   goes  best  when  served  warm  with cold plain vanilla  ice cream. Wow!!!,  this  is  really very  tempting  and I bet, you  cannot  resist  it . I  never  ever  thought i will bake this  cake at home. Applause to me!!!!!!,   that was  a  super  hit  at  home  and   with all my  friends . Today  on occasion  of our  fourth anniversary, i made this  cake  and  served to all my friends. i was  on cloud nine  when i  received the comments for the cake. The  recipe  of  it is  from a  famous  cooking website show me the curry and  and  blog i follow edible  garden. Thanks  to them.

This  is   third  time  in a  row  that  i am trying this recipe , first  time  i baked,  it  was a  super duper  hit.  Being very  enthusiastic  with all the praises i  got,i made couple of mistakes in my second try and went  into  drains ,   First  was to use the  wrong chocolate , i used the bitter  chocolate for the  semi sweet once, this  was  not a  delibrate mistake  but  was side  effects  of being  over enthusiastic,  i picked the  wrong packet  from the  freezer. and  second  one  is  i  baked it  for almost 20 mins , end  result was a  completely bitter  chocolate  cake  which was  no good. Learn from  my  mistake plzzzzzzz will u?


Item : Molten Lava cake
source : show  me the curry  and  edible  garden
baking  time  10-15 mins
preperation time   20 mins

Ingredients:

  • 4oz (113g) of semi sween baking chocolate (i used the  chocolate chips )
  • 4oz (113g) of  unsalted butter 
  • 2eggs
  • 1/3 cup (75 gms) of  sugar 
  • 1/4 cup (40 gms) of  All purpose flour
  • Powdered Sugar  for dressing 
How i made it .
  • In a double  boiler  melt the chocolate ,  once  it  gets  soft and  shiny  add  butter  to it , mix well till the better  gets  meletd . Take  it off from the flame and cool it .

  • In a seperate bowl  add eggs and  sugar   and  beat  it untill light and  fluffy .

  • Mix the  melted and cooled  chocolate to the  egg and  sugar  mixture


  •  Now add the all purpose flour and  mix  it   well.
  • Butter  up  your ramekins and bake  pans  and  pour the  batter  till 3/4th  way full.
  • Bake  it in a preheated oven for 350 degree Fahrenheit for 10-15 mins  , do not  over do  it .


Wednesday, June 22, 2011

Mango Lassi

Mangoes are the king of  fruits,  and they taste good  in any form . I love  this  fruits , ever since i  moved  to US i longed  for  mangoes. We d get  mangoes here but the  variety  and  the  flavor and taste  that we get in  India  is not in match. But  at Costco we  got good mangoes and  believe  me all the  8 mangoes were done in a day. had  go to get more of them. here is an all time  favorite summer drink we all love. my mom loved mangoes, lassis and mango lassi was her  favourite too.


Mango Lassi:

  • 1 ripe mango  pealed  and  cut  into  pieces
  • 1 cup yogurt /curd
  • 1/2 cup milk (optional)
  • cardamom powder
  • sugar  depend on ur taste  and also the sweetness of the mango.

Take  all the above ingredients ina  blender jar  and  belnd it  to   for  few minutes  and the  pour  it  glasses and  serve it  cold.


Green Mutton gravy

Let  me  not  give any introduction but straight away go to the recipe .


What we need :

  •  1lb Mutton 
  • whole garam masala
  • 2-3 onions 
  • ginger- garlic  paste
  • Bunch of  mint ( 15-20 strands)
  • Fresh ginger
  • Coconut powder
  • 2 medium sized potatoes diced.
  • Oil
  •  Turmeric
  • Garam  masal  powder
  • 8-10 Green chillies (depends on u r taste)
  • Lime .
How I made it 
Step 1; Boil the mutton .

Wash the  meat to it add 1 tsp ginger -garlic paste, one slmall onons  diced, salt , turmeric and  whole gram masala , take  in  a  pressure coker and pressure cook it for 2-3  whistle  ot  till the  meat  is  soft.

Step  2: making the masala
In a  mixer or  blender cup take  mint leaves, coriander leaves, ginger piece and coconut powder and  green chillies. grind  with little  water to make  it to nice masala.

step  3:
Now in another pan  pour  oil  when  heated add  grated  ginger , fry till its brown  and  now  add  whole garam- masala , wait  for  few seconds and  add ur  onions, potatoes, half of  mint and  2-3 green chillies , fry them  till   onions are brown , now  add tomatoes cook till it  is soft. Now  add the mint  coconut  ground masala. mix weel and   cook in a  slow  falme  till the raw  smell is  gone and  oil seperates. At the end  add 1 tsp of  lime  juice to the  gravy mix  well and  is  ready to be  served. Do not  skip the  lime  part as  it enhances the taste.


Monday, June 20, 2011

Plain fried rice (bagar rice ) indian style

I really  dont know  how  to  name this  dish in  english , we all at home  we  call it bagar rice . Bagar  in hindi means seasoned . This  is  actually a  simple  but  rich  dish.  It  goes with all veg and  non veg gravys. It adds a  rich  feel  to your food. its not the chines's  fried  rice  types  too. so  i have  christened  it with  my  own  name. To be   true  the  name  dosent  matter  when  it  comes to  taste.  if the  dish tast  good  i  dont  mind it  with any name. My friends  in  my apartment  love  this   dish  and its  always in demand  list for any potluck we have  here . Specially   Abhi  who has this rice on her top priority. This  recipe is  for   u Abhi , have   fun  making and also eating it . All others too im sure u will like  it  its  simple  yet  rich , easy making and  best  when  u have  guests on a short notice .


Item:  Plain fried  rice .
source: My  Mom
Time : 15-20 mins .

Ingredients:


  • 1 Cup Basmati rice 
  • Whole garam masala( 1/2 inch cinnamon stick, 4-5 cardamon, 1/2 tsp shahi jeera . bay leaf , 1 star aniseed, 4-5 cloves)
  • 1-1/2 tsp of  gingergarlic paste
  • 2 tsp of freh curd (yogurt)
  • 1medium onions
  • oil
  • Mint leaves( 4-5 Springs )
  • cilantro
  • 1 1/2 cup water 
  • pinch of  turmeric 
How i Made it.

Take oil in a  pressure cooker , when hot add  your whole garam masala,  after  few seconds add  finely sliced onions and mint leaves,  fry till the onions is  brown , now add  ginger garlic paste , fry till the raw smell is  gone . Now add  your yogurt  and  fry  till u get  nice aroma, and add  1 1/2 cup water. then add in  your  washed basmati rice   and  salt and pinch of turmeric . mix well and  close the  cooker  wait for 1 whistle and  turn the flame off. Open it cooker when the pressure is  gone and is  ready to serve . Garnish with fresh cilantro and fried onions .


Gongura chutney

 Gongura is every andhraite's favourite , since i   have  a andhra link i too love Gongura, it taste great in  any  form, in  dhal, as  chutney,  as pickel or  in meat . Needless to say  i  love it  with the meat . In  our wedding  too we had this  dish gongura mutton served on haldi function and  it was a great  hit. This  recipe  is  from my mom kitchen. This  is a  very simple dish  but needs a lot of muscle power to actually make the  greens to a  nice  paste, u can anyway do in a blender or a mixer  but  using a  wooden smasher has its own taste. This  will go with  jowar roti , plain white rice or even chapathi.


Item : Gongura chutney
Source: Mom

Ingredients :


  • 1 bunch of  Gongura ( Red sorrel leaves)
  • 1 medium sized onion  diced 
  • 4-5 peeled  garlic pod
  • 6-7  green chillies (based on how much  spicy u  want  it )
  • salt
For  tempering 
  •  4-5 tsp of Oil 
  •  1tsp Cumin seeds
  • 4-5  dry red chilli
  • spring of  curry leaves
  • 4-5 smashed garlic pods
How i made it .

 Pluck the leaves  and  wash it throughly , take a big  vessel , add oil to it , when  hot  add onions, curry leaves, garlic pods green chillies and  fry them  for  1 min , then add your gongura leaves and  salt. Allow these to cook  in medium  flame   till the  leaves  become soft . Do  not any  water  to it , and  cook it all the  water  from the  leaves  gets evaporated. Once its  done switch off the flame allow it  to cool. then with the laddel or potato smasher  try  make  it  to  a paste , if u cant do it u can use a  blender for  it  but do  not make a  fine  paste. Now  temper it .

In another  wok or kadai  pour some oil when  hot add your cumin seeds , red  chillies , garlic pods , fry them till they  a  slightly brown, now  add your gongura paste  and  allow  it to get blended  with the tempering. Its  ready to be  served and  can be stored.


Thursday, June 16, 2011

Green Peas Pulav

 Peas Pulav is  my daughters  favourite , its  very  easy   and  handy when u  have  guest at a  short notice  its  rich  and  delicious and  also nutritious.   It  goes well with all the veg  gravy dishes and  needless say with all the  non veg dishes. Its  easy and   quick recipe.


Item: Green Peas Pulav .
source: My  Mom
Time : 15-20 mins .

Ingredients:


  • 1 Cup Basmati rice 
  • 1/2 cup Green peas (fresh is  always  better  but  frozen works  great too)
  • Whole garam masala( 1/2 inch cinnamon stick, 4-5 cardamon, 1/2 tsp shahi jeera . bay leaf , 1 star aniseed, 4-5 cloves)
  • 1-1/2 tsp of  gingergarlic paste
  • 2 tsp of freh curd (yogurt)
  • 1medium onions
  • oil
  • Mint leaves
  • cilantro
  • 1 1/2 cup water 
How i Made it.

Take oil in a  pressure cooker , when hot add  your whole garam masala,  after  few seconds add  finely sliced onions and mint leaves,  fry till the onions is  brown , now add  ginger garlic paste , fry till the raw smell is  gone . Now add  your yogurt  and  fry  till u get  nice aroma, add in  your peas, fry  for a minute and add  1 1/2 cup water. the add in  your  washed basmati rice   and  salt . mix well and  close the  cooker  wait for 1 whistle and  turn the flame off. Open it cooker when the pressure is  gone and is  ready to serve .


Wednesday, June 15, 2011

Hyderabadi chicken biryani

This one is  not  from my moms  diary  but  its  from my aunts , thats is  my  moms  sister (Sheela)  I call her Maa. .She is  an expert in cooking biryani and   i am one  of  her countless fan  her biryani has. Maa dose it  with  so ease and that makes  me  thinks that  preparing biryani shouldnt be tough and that is  what made me  try this .Intially i was not very good  at  it  but now  i love  cooking  and serving biryani .Thanks  to maa  who constantly encourages me to cook specially biryani. Thanks Maa.
Comming to  biryani  there  are  numerous variation and  all the  variety differs  and  i  think  king of biryani is hyderabadi biryani. The  way  the aroma , rice and the meat  gets blended is real wonderfull. All those who have tasted hyderabadi biryani will surely vouch for  it , its  very royal  and very aromatic. There are two types of biryani , first being the kachi (raw)dum (slow cooked in the steam )biryani , and  the other one being the paccki  (cooked)biryani . The  first  where in the meat (chicken or lamb) is  raw and  gets cooked in the process, the second one per say is  where we used boiled or cooked meat.The  Kacchi  or raw biryani  is very  famous  but  both taste good.
Todays  menu is kacchi (raw) chicken biryani  with raitha .


Item Chicken Biryani
source : Maa (my aunt)
Time : 1hrs 30min.

Ingredients ::
  • 2 cups Baskmati rice 
  • 1lb chicken de-skined
 Step 1:   frying onions :
  • 3-4  big onions  sliced finely and  deep fried  to  brown in colour.
  • oil

  Step 2 : Marination  of chicken
  • 500gms of chicken
  • 2 cups  curd 
  • 4 -5 tsp of freshly ground ginger garlic paste
  • whole garam masala ( 1inch cinnamaon stick, 4-5 cardamon,1 big black cardamon, 5-7 cloves, bay  leaf . shahi-jeera, aniseed )
  •  1-1/12 tsp garam masala powder
  • 1tsp of coriander powder,
  • 1tsp of chilli powder,
  • Salt 
  • Turmeric
  • 1 medium sized tomato
  • 1 bunch of mint leaves ( 8-12 strands )
  • 1 bunch of cilantro (coriander leaves)
  • 7-10 green chillies 
  • lime  juice  from  3-4  medium sized limes 
  • Saffron colour 
  •  Fried onions. ( half  of from the step 1 )
  • oil . (can use the same oil used for  frying)
 Take the chicken in a  big vessel (the vessel u  want to cook biryani) and add all the above ingredients and mix well. Crush  the fried onions and  add  it to the marinate. Cool the oil  that wass used to fry onions and add about 50-100 ml of it .  keep it marinated  for 30-40 mins.


 Step 3 : Preparing the Rice 
  • 2 cups  basmati rice (soked for 30 mins prior use )
  •  1-1/12 cup  water  ( chicken stock can be  used , or coconut  milk can  be  used instead of water )
  •  salt 
  •  whole garam masala 
  • Mint leaves 
  • coriander leaves 
  • saffron color
  • 3-4 spoon of oil

  Wash and  Soak the  basmati  rice  30 mins  prior to the use in a  pressure cooker ( u can opt for not using the cooker and  cook in a  regular vessel  but   cooked in a tradional way , where u have  to keep monitoring for the rice  to be cooked  upto 60-70% , we  donot want the rice to be completely cooked )  cooking in a  pressure  cooker makes the process easy and  fast. To the  rice  add 1-1 1/2 cup of water or chicken stock . T;o  it add the whole garam masala , mint leaves coriander leaves and salt . add a pinch of saffron colour. Keep it on medium flame with out the pressure weight .Allow the  rice to  cook only 70%. Put the flame off when the steam starts gushing out wait for couple of minutes and then open the cooker.

Step 4 : Layering the rice.
  • Saffron colour  diluted in  about 4-5 spoon ful of water or  milk.
  • lime juice from 2-3  lime
  • 50 ml of oil
  • mint and criander leaves 
  • Fried onions.

 Once the rice is  ready , carefully layer it on the marinated chicken. Top it  with saffron colour , lime juice . mint and coriander leaves,  oil  and fried onions  . Close the vessel with the tight glass lid so that the steam dose not escape if u dont have a  vessel with  glass lid the  u can use regular lid but u have seal the lid with chapathi dough so  that the steam dosent escape and Keep the biryani on medium flame .

Step 5 : Cooking the biryani


This is the most important step . Here is when the glass lid comes in handy , when the biryani get  cooked on medium heat , u can see the vapour droplets  forming on the glass lid (which will take  around 15-20 mins)  leave  it  in the same  stage for  another  5-10 mins  and then  reduce the flame  now keep a  griddle  underneath  your  biryani vessel ( i forgot  to take the pic will update it  soon )  and leave it to be slowly cooked  for another 20-30 mins . If  u  dont have the the glass lid then  what u can  do all the checking  manually , check after 20- 30 mins  and  then  keep the griddle  under the  biryani vessel. The  time  will differ with the quantity of biryani.. Once its done its ready to be served .

Enjoy the royal aromatic delicious biryani with raitha.


Saturday, June 11, 2011

Dry Mutton chukka

 This  will be a bliss for all the meat lovers, all my friend and my hubby loved it  when i made it  for yamini . its  a quite a  simple  recipe  and  would   serve as a side  dish for  rice or chapathi . This  is   from one of the recipes my friend  gave me .  Try this  out  i am sure  u will like  it.

Item : Dry Mutton Chukka
source : Friend

Ingredients :

To Boil the meat

  • 1lb of  meat  
  •  1 tsp of  ginger garlic paste 
  • 1small onion
  • whole garam masala( 1/2 inch cinnamon stick, 2-3 green cardamom, 4-5 cloves)
  • Mint leaves 
  • 1/2 tsp turmeric powder
  • Salt

 Wash the meat  thoroughly  and add turmeric and all the above mentioned ingredients  and  pressure cook it  to 2 whistles or till its 70% cooked. keep it  aside .

Ingredients for the dish

  • 2 onions diced
  • cumin seeds
  • 4-5 garlic cloves 
  • 1tsp of pepper corns  ( crush the  cumin , garlic  and pepper in motar and pestel and keep the paste  ready)
  • Butter
  • turmeric 
  • 1tsp of chilli powder
  • 1/2 tsp of criander powder
  • 1/2 tsp of zeera powder
  • 1/2 tsp of garam masala powder
  • oil
  • curry leaves 
  • 4-5 slit green chillies
  • cilantro
  • 1 tsp of ginger garlic paste
How i did it 

Take a heavy bottom wide pan , heat it and  add butter , as the butter melts  add cumin seeds and  onions , when the  onions turn slight brown  add  the  ginger garlic paste let  it  fry  till the raw smell is  gone and  now  add the garlic,cumin and pepper crushed paste , let it  fry . Add curry leaves and slit green chillies fry  them  add turmeric, chilli and coriander and cumin powder. fry  it and add the boiled  mutton  with very little  stock in it. let the  whole  thing cook  on a  slow  flame  till the  meat  is completely cooked. Check for  salt as we added salt while the meat boiled, adjust the  salt if  less. now  at last  add garam masala powder and cilantro. fry till the mixture is  dry  and is ready to serve.


Friday, June 10, 2011

Sweet Dosa

 I have  been out  for  a long weekend to florida  and  later  was  very tired to  write  or make  something at  home,  the next week end  was  very  much  fun with lots  of celebrations and  friends which occupied  my complete week end and couple  of  days  in the   new week  so could not do much ...  will be prompt in posting recipes from now  on . first  one  after th e break is  for  kids

Sweet  Dosa

This   one  is  specially for kids  i had   it  when i was small and  i like it a  lot. Can be  prepared  inan instant and  sure is  tasty  my  daughter  loves it .

Item : Sweet  Dosa\
Time  taken 10-15 mins
Source : Mom.

Ingredients 

  • 1 cup Wheat flour 
  • 1 cup powdered jaggery or  sugar (both will taste  good )
  • 1/2 tsp cardamom powder
  • shredded coconut
  • water 
 Take  jaggery in a  bowl and  add water to it ot dissolve it, if u using the cubed jaggery then add water  to it microwave it for  couple of  minutes and cool the  mixture. Add this  mixture  to the  wheat  flour  to make a batter of   dosa consistency. Mix thoroughly  so that  there are no  lumps in it .Finally add cardamom powder for nice sweet flavour. Heat the  griddle   and pour a cup full of batter smear it  to make  nice thin dosa add oil and  wait  till its  brown and cooked on both the sides  now add shredded coconut to  it  and is ready to  be served.